
Whether you’re a weekend warrior or a daily commuter, maintaining your bike can be the difference between a smooth ride and a frustrating breakdown.
Imagine cruising effortlessly on your trusty two-wheeler, knowing that every component is in peak condition.
In this comprehensive guide, we’ll unlock the secrets to maintaining quick release bike components, ensuring your rides are always safe, efficient, and enjoyable.
Practical Bike Maintenance Tips
Keeping your bike in tip-top shape is easier than you might think. Regular check-ups not only save you some headaches but can also make each ride feel like a breeze.

Importance of Regular Maintenance
Why bother with bike maintenance? Here’s the scoop:
- Safety: A glitch-free bike means a safer ride. You’ll dodge those nasty surprises that might land you on the pavement.
- Performance: A well-tuned bike rides like a dream—it’s smoother than a buttered pancake.
- Longevity: Take care of your bike, and it’ll stick with you longer.
- Cost Savings: Spotting a problem before it blows up can save you a chunk of change.
Want a plan? Check out our bike maintenance schedule.
Essential Tools for Bike Maintenance
Got all your bike gadgets ready? Here’s what’s gonna make your DIY repairs a cinch:
| Tool | Use It For |
|---|---|
| Bike Repair Stand | Keep your bike steady while you tinker. Curious about stands? Peek at our best bike work stands. |
| Multi-Tool | Like a Swiss Army knife for bikes, it’s packed with Allen keys and other goodies. Dive into the best bike multi tools. |
| Chain Lubricant | Make sure your chain isn’t squeaking like a mouse. Check out the best bike lubricants. |
| Tire Pump | Yep, you’ll need it to keep those tires pumped. Our bike tire pressure guide is super handy. |
| Chain Wear Indicator | It tells you when your chain’s stretched too thin. More on bike chain wear. |
| Cleaning Brushes | Get rid of all that gunk and grime. See the best bike cleaning products. |
| Hex Wrenches | Must-haves for tweaking your bike parts. |
| Torque Wrench | Tightens bolts just right. Check the details on the bike bolt torque specs. |
Stock up on these, and you’ll breeze through your fixes like a pro. Our bike tool kit essentials have more neat stuff.
Regular maintenance isn’t just a chore, it’s what keeps your trusty steed rolling strong. So whether it’s a tire check or a brake tweak, getting ahead of issues can save you time and bucks. For more handy tidbits, scope out our bike repair guides.
Basic Bike Maintenance Procedures
You’re about to dive into the basics of bike care—stuff nearly as essential as the pedals themselves! Keeping your bike snug as a bug in a rug pays off in longer life and smoother rides. Here, you’ll learn about cleaning your bike, slathering some lube on its bits, and making sure those tires are pumped up like a pro wrestler’s muscles.
Cleaning Your Bike
Turning your bike into a grime-fighting superhero is easier than you might think. Dirt hanging around can act like that annoying sand in your swimsuit—abrasive and damaging.
- Spray your bike with water to shed the clinging dust bunnies.
- Introduce your bike to some mild soap or a special bike cleaner; give it a bubble bath with a trusty sponge and rinse thoroughly.
- Tackle the tricky spots—like the derailleur and chain—with a brush, ’cause nobody likes a dirty chain.
- Pat your bike dry with a clean towel, like you’re tucking in your favorite pet.
Need more elbow grease tips? Hop over to our clean bike chain guide for the nitty-gritty.
Stuff You’ll Need:
- Water
- Mild soap or bike cleaner
- Sponge or soft brush
- Clean rag
“Regular maintenance is the cornerstone of a great biking experience. It not only ensures safety but also enhances performance.”
— Jane Doe, Professional Cyclist
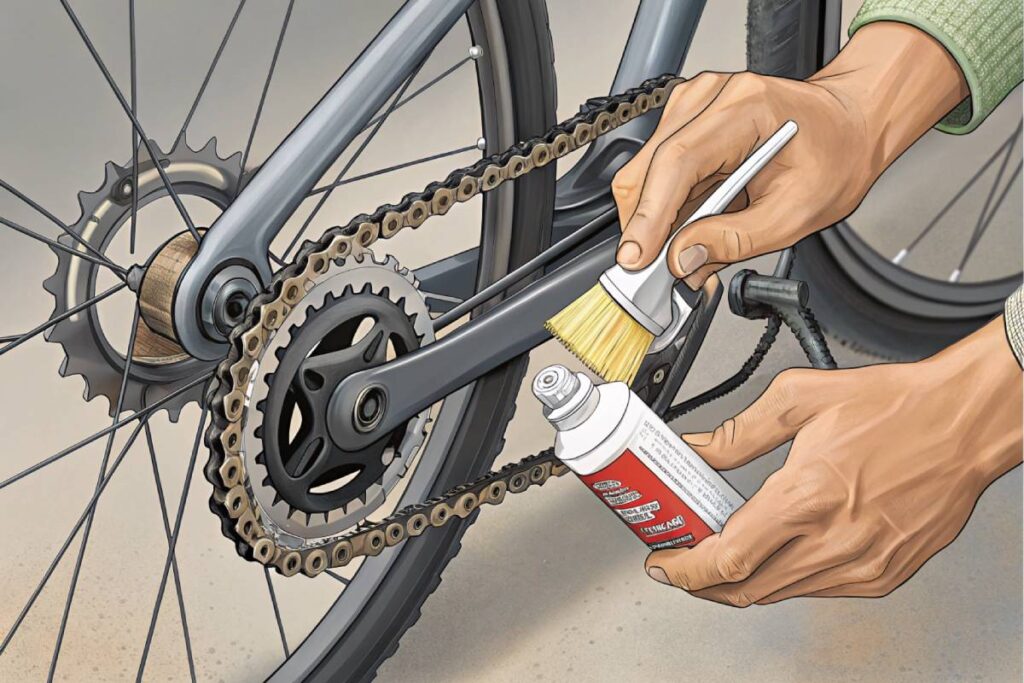
Lubricating Moving Parts
Let’s talk lube: it’s the secret sauce ensuring your bike’s bits don’t squeak and whine. Chucking some slick stuff on reduces the metal-on-metal crime and fights off rust.
- Clean off the bits you plan to lube up, especially Mr. Chain.
- Douse your chain, derailleurs, and pals in a bike-friendly lubricant—not just any ole oil will do.
- Wipe off any extra gunk with a rag. No need for more than a light film.
Curious about which lube to snag? Check our best bike lubricants for the down-low.
Parts That Love Lube:
- Chain
- Derailleurs
- Pedals
- Brake and gear cables
Checking Tire Pressure
Keeping your tires juiced up just right means no wobbles or unexpected roadside meltdowns. Under-inflated tires are like running a marathon in sandals—it doesn’t work.
| Tire Type | Recommended Pressure (PSI) |
|---|---|
| Road Bike Tires | 80 – 130 |
| Mountain Bike Tires | 30 – 50 |
| Hybrid Bike Tires | 50 – 70 |
| E-Bike Tires | Check your model for specifics |
Dial up the details on tire pressure over our bike tire pressure guide.
- Use a pressure gizmo to see where you’re at.
- Adjust the air until your tires are like Goldilocks—not too hard, not too soft.
- Cap it off by popping the valve cap back on to keep out the nasties.
Stick to these handy hints, and your bike will sail the streets like new. Peek at our collection of bike repair guides for more wisdom, and don’t forget to consult our bike maintenance schedule to keep your routine on point.
Advanced Bike Repairs
Keeping your bike’s quick release parts in tip-top shape is key for a chilled and safe ride. We’ll tackle a few topics here like tweaking brakes and gears, swapping out brake pads and cables, and patching up a flat.
Adjusting Brakes and Gears
Getting your bike’s brakes and gears all set up right is a no-brainer for safe rides and smooth gliding. Start by checking each part to make sure it’s doing its job. Spotted a hitch? Most of the time, a quick fix will do the trick.
Adjusting Brakes:
- Scope Out the Brake Pads: Make sure they line up with the rim and aren’t worn down.
- Tweak the Cable Tension: Use the barrel adjuster to get the tension just right so the brakes work smoothly.
- Peek at the Brake Levers: Ensure they’re engaging the brakes gently, without a lot of effort.
Adjusting Gears:
- Index Those Gears: Make gear changes smooth as butter by adjusting cable tension (Indexing explained).
- Tinker with Limit Screws: Fine-tune these buggers to keep the chain from jumping ship.
- Derailleur Check: Both the front and back ones need to be aligned just right (Adjust brakes here).
“Understanding the intricacies of your bike’s components empowers you to tackle any issue on the road, keeping your ride smooth and reliable.”
— John Smith, Bike Mechanic Expert
Replacing Brake Pads and Cables
When your brake pads get shabby, stopping becomes more like wishful thinking. Same deal with the cables—they’ve got to be swapped out once in a while to keep the stopping power strong.
Swapping Out Brake Pads:
- Ditch the Old Pads: Use a screwdriver to pop out the screws holding them.
- Attach New Pads: Slot the newbies in and screw them tight, making sure they hug the rim right.
Swapping Out Brake Cables:
- Get Rid of the Old Cable: Loosen the bolt on the brake caliper and yank it out.
- Thread the New Cable: Start from the brake lever and feed it through to the caliper.
- Tighten and Check: Hook it to the caliper, bolt it down, and test your handiwork (Brake pad advice).
Fixing a Flat Tire
If you’re up close with a flat tire, know that it’s a basic yet crucial skill. Follow these tricks to bounce back on the road.
Flat Fix How-To:
- Pop Off the Wheel: Undo the quick release and slide the wheel off the bike frame.
- Take Off the Tire: Tire levers help peel the tire from the rim.
- Locate and Mend the Leak: Inflate the tube, find the hole, and slap on a patch.
- Get the Tire Back Together: Tuck the tube back into the tire, push it onto the rim, and inflate it to the sweet spot pressure.
| Task | Tools You’ll Need |
|---|---|
| Adjust Brakes | Screwdriver, Wrench |
| Swap Brake Pads | Brake Pads, Allen Key |
| Change Cables | Brake Cable, Pliers |
| Fix Flat Tire | Tire Levers, Patch Kit |
For more thorough guides, check out bike repair how-tos.
By nailing these bike repair skills, your ride will stay sharp and safe. Visit our essential bike tool kit to gear up and bike safety tips for keeping your bike road-ready.
E-Bike Maintenance
Keeping your e-bike in tip-top condition is like taking care of your favorite gadget—it only works great if you look after it. This guide’s got all the goods to make sure your e-bike’s always ready for that smooth ride you’re after.
Understanding E-Bike Components
E-bikes have a bit more going on under the hood than a regular bicycle. Let’s break it down:
- Motor: That magic box that gives your pedaling a bit of a superpower boost.
- Battery: Think of it as your e-bike’s energy drink.
- Controller: The middleman between the battery and the motor.
- Display Panel: Your dashboard, shows speed, battery juice, and power level.
- Sensors: Little wizards tracking how hard you’re pedaling to adjust the assist level.
Taking the time to keep these parts in check can save you from e-bike agony down the road. Keeping an eye on the motor now and again for grime or damage could keep major headaches away. And if you want to play bike mechanic, check out our bike maintenance schedule for tips on keeping everything clean and pumped.
Battery Maintenance Tips
Your e-bike’s battery is like its heartbeat—give it some love, and it’ll keep ticking longer. Here’s how:
- Charge Regularly: Don’t wait till it’s drained to juice it up. Plug it in after every trip.
- Store Properly: A cool, dry spot is the best home for your battery. Keep it comfy.
- Check Connections: Make sure those battery terminals are spotless and well-plugged in.
Need a quick battery checklist? Here you go:
| Task | Frequency |
|---|---|
| Charging after each ride | After each ride |
| Cleaning battery terminals | Once a month |
| Full discharge cycle | Every 3 months |
For tips on sheltering your e-bike and battery from nature’s mood swings, check out proper storage practices.
Troubleshooting Common Issues
Every bike, even a snazzy e-bike, can run into snags. Here’s the low-down on fixing common hiccups:
- Battery Not Charging: Peek at the charger and connections. Try another outlet if it’s still a no-go.
- Motor Not Running: Loose wires? Low battery? Give ‘em a check.
- Display Panel Acting Up: Turn it off and back on. Still, acting weird? Peek at the manual.
For a quick troubleshooting cheat sheet:
| Problem | Possible Cause | Solution |
|---|---|---|
| Battery not charging | Loose connection, bad charger | Check connections, try another charger |
| Motor not running | So-so battery, loose wire | Try a reboot, check the wiring |
| Display not working | Tech hiccup, wire issue | Try a reboot, check wiring |
For more on bike blips and how to fix ’em, swing by bike noise problems and emergency bike repair.
Stay on top of these components and give ’em some TLC, and your e-bike will keep the good times rolling. A little upkeep now means your trusty ride will keep you pedal-happy for ages.
Budget-Friendly Maintenance Hacks
Keepin’ your bike humming along smoothly doesn’t have to send ya to the poorhouse. With a bit of creativity and some common household items, you can make sure your wheels stay in tip-top shape without burning a hole in your wallet. Whether you fancy yourself the next MacGyver or you’re just someone who relies on pedals over petrol, these tricks are tailor-made for you.
DIY Cleaning Solutions
You ain’t gotta splurge on pricey cleaning products to keep your bike squeaky clean. With just a few everyday items from your kitchen, you can whip up potent cleaners that’ll do the trick just fine. Here’s how to get your bike sparkling using stuff you already have:
Mild Dish Soap and Water
- Splash a little mild dish soap with water into a spray bottle.
- Perfect for sprucing up the bike frame, handlebars, and seat.
Baking Soda Paste
- Mix bakin’ soda with water to whip up a paste.
- Your secret weapon against stubborn dirt and greasy bits.
White Vinegar Solution
- Blend equal parts white vinegar and water.
- Fantastic for zapping grime off rims and tires.
DIY Cleaning Solution Table
| Solution | Ingredients | Uses |
|---|---|---|
| Dish Soap + Water | A few drops of dish soap | Frame, handlebars, seat |
| Baking Soda Paste | Baking soda, water | Stubborn dirt and grease |
| Vinegar Solution | Equal parts vinegar, water | Grime removal from rims and tires |
Curious about tackling more bike-cleaning tasks? Swing by our article on how to clean a bike chain for more pointers.
Repurposing Household Items for Repairs
No need for high-tech gadgets when it comes to fixing up your bike. You probably have all the tools you need gathering dust in a drawer. Here’s how to give them new life:
Old Toothbrushes
- Give your old toothbrush a second career cleaning the bike chain, sprockets, and hard-to-reach corners.
Sponges and Rags
- Perfect for wiping down and applying lubricants like nobody’s business.
Clothespins
- Handy helpers for holding cables steady while ya make adjustments.
Zip Ties
- The duct tape of the bike world—great for quick fixes when things come loose on the road.
- Looking for more repair strategies and hacks? Peep our bike repair guides for the full scoop.
Household Items for Bike Maintenance Table
| Household Item | Purpose |
|---|---|
| Toothbrushes | Cleaning chain and sprockets |
| Sponges and Rags | Wiping down the bike and applying lube |
| Clothespins | Holding cables |
| Zip Ties | Securing parts temporarily |
Got a flat? Come prepared with our step-by-step on fixin’ a bike flat tire. And if it’s brakes and gears giving you grief, check out how to fine-tune them by adjusting bike brakes and bike gear indexing.
Just a heads up: Regular upkeep nips future problems in the bud. Keep up with what’s what by following our trusty bike maintenance schedule.
With these money-saving hacks up your sleeve, you can take care of your bike without stretching your budget thin. Most maintenance can be done right at home with stuff you’ve already got. Who knew bike upkeep could be this easy on the wallet and the clock?
Commuter Bike Care
Taking care of your commuter bike is like giving it a TLC (tender loving care) to make sure every ride is smooth and safe. Here are some handy tips to keep your two-wheeler in top-notch condition.
Proper Storage Practices
Where you keep your bike can make a world of difference in its condition. Check out these storage tips:
- Indoor Storage: If you’ve got the room, stash your bike indoors. This way, you guard it against lousy weather and sticky fingers. Wall mounts or indoor racks are perfect—they help you save space and keep your bike outta harm’s way.
- Bike Covers: No room inside? No sweat. Grab a sturdy bike cover. It’s like a cozy jacket that shields your bike from dust, rain, and that pesky sun. Just make sure it fits nice and snug and is built to last through any weather.
- Secure Locking: Whether inside or out, slap on a solid lock. Heavy-duty chains or U-locks say “hands off” to would-be thieves.
Need a more in-depth look at storing your bike? Slide over to our bike storage guide.
Protecting Your Bike from Elements
Mother Nature can be rough on bikes, but these tips can help keep yours looking sharp and rolling smoothly:
- Moisture Protection: Rain’s great for flowers, but not so much for your bike. Dry it off after soggy rides and keep it somewhere dry. A dab of rust inhibitor is like lotion for your bike—keeps it young.
- Sun Protection: Too much sun can leave your bike’s paint job tired and plastic parts brittle. If you park outside, seek out shade or cover it up with a UV-resistant cover.
- Winterizing: Cold snaps can mess with your bike. Slap on some winter-friendly lube on the chain and moving parts. Need more winter tips? We’ve got you covered with our winter bike maintenance guide.
| Element | Protective Measure |
|---|---|
| Moisture | Wipe down after rides, store in a dry place, use rust inhibitor |
| Sunlight | Store in a shaded area, use a UV-resistant bike cover |
| Cold | Use winter-specific lubricant, follow winter maintenance guidelines (winter bike maintenance) |
Keeping your bike shielded from the elements isn’t just about looking snazzy—it’s about keeping everything running like a well-oiled machine.
Looking after your commuter bike means storing it right and guarding it against the whims of nature. For more nuggets of wisdom on keeping your bike in line, like cleaning your bike chain or adjusting bike brakes, stop by our library of bike repair guides. Stick with these pointers, and you’ll have a bike that’s always ready to roll whenever you are.
Weekend Rider’s Maintenance Checklist
Pre-Ride Safety Check
Before you zip down the road or hit the trail, make sure your bike is in solid shape. Here’s your quick fix-it list to keep things smooth:
- Quick Release Levers: Double-check that the quick release levers on your wheels are snug and tight. Nobody likes surprises with loose wheels.
- Tire Pressure: Peek at your tire pressure to ensure it’s just right. Pump ’em up if needed ’cause nobody likes a flat day out. Need tips? Check our bike tire pressure guide.
- Brakes: Test those brakes—front and rear—to make sure they’re sharp and ready. Any wobble or softness, time to tweak. We’ve got your back with tips on adjusting bike brakes.
- Chain: Get that chain cleaned up and lubed so your ride feels like butter. A squeaky chain is a squeaky ride. Hit up our guide on cleaning your bike chain.
- Gears: Run through all the gears to make sure everything’s clicking smoothly. Out of sync gears can make for bumpy rides. For help, check out our gear adjustment guide.
- Lights and Reflectors: Flip on your lights and check reflectors—visibility is key, especially when things get dim.
Post-Ride Maintenance Routine
After you’ve had your riding fix, a bit of care goes a long way in keeping your bike in top-notch condition for next time:
- Clean Your Bike: Brush off dirt and mud from the frame, chain, and gears. Here’s our pick of top cleaning products to make it easy.
- Lubricate Moving Parts: Keep rust at bay! A few drops of lubricant on the chain and other moving bits ensure a silky ride. Have a look at our favorite bike lubricants.
- Inspect Tires: Scan for any signs of tire troubles—cracks, bits of junk stuck in there. Check the tread and maybe give your tires a spin (literally) with our tire rotation tips.
- Check Quick Releases: Post-clean, double-check those quick release levers. A little check can save a lot of headaches.
- Brake Pads and Cables: Peek at the brake pads; if they’re worn thin, swap ’em out. Spot any frazzled cables? Time for new ones. Here’s our guide on replacing brake pads and cable maintenance.
- Wipe Down: Give everything a final wipe with a clean cloth. Clean off extra lube to keep dirt from sticking around.
- Store Properly: Tuck your bike away in a dry, safe spot. Keep it away from weather and sticky fingers. Need tips? Check our bike storage guide.
By making these checks part of your routine, you’ll keep your bike rolling in primo condition, making every ride safe and wicked fun. Stay on top of it all with our handy bike maintenance schedule. Now get out there and ride!
Keeping Your Bike Ready for the Race
For those racing on two wheels, keeping your bike in top shape is like making sure your shoes are tied before a sprint—it’s an absolute must. You want every pedal to count and every mile to fly, so here’s how to make sure your ride’s always ready to roll.
Tuning Up for the Win
Tuning your bike isn’t just about keeping it running; it’s about making sure it runs like a dream. Plus, it keeps you safe from unexpected mishaps out there.
Must-Do Adjustments
- Brakes and Gears: Get up close and personal with your bike brakes and gears; they need your attention. Smooth gears keep you shifting right along and help your bike last longer.
- Chain and Cassette: Keep the bike chain and cassette slick and clean. It’s like buttering your toast so it slides down easily. Using the best bike lubricants can really help.
- Wheel Alignment: Make sure those wheels are running straight ‘and true. Either learn how to use a truing stand or find a bike buddy with the skills.
- Tire Pressure: Proper tire pressure makes you feel like you’re flying, not flopping. Check our bike tire pressure guide to get it just right.
- Bearing Maintenance: Don’t let rusty bike bearings slow you down. Clean and lube them up to keep the good times rolling smoothly.
Keeping Up with Tunes and Tweaks
Tracking when your bike needs a little TLC isn’t something you just wing. You can scribble it down or use fancy apps that do the remembering for you.
| Part | When to Check | Upgrade Ideas |
|---|---|---|
| Chain | Each 500-1,000 miles | Go for a tougher, lighter chain |
| Brake Pads | Each 3,000-4,000 miles | Try out carbon or ceramic; they stop on a dime |
| Tires | Each 2,000-3,000 miles | Swap to tubeless or performance tires |
| Drivetrain | Each 1,500-2,000 miles | Look for lighter or more precise parts |
| Suspension | 1,500 miles or yearly | Consider advanced setups for precision |
Need to get in deep with your bike’s upkeep? Peek at these for the nitty-gritty:
- bike maintenance schedule
- fix bike flat tire
- true bike wheel
- bike gear indexing
- bike cable maintenance
Keeping a sharp eye and a steady hand on maintenance keeps you from drifting into “uh-oh” territory. Follow these easy-peasy tips and keep your bike race-ready. Rides will be better, races will be tougher, and distances will vanish under your wheels.
Conclusion
Maintaining your bike’s quick release components doesn’t have to be a daunting task. By following regular maintenance schedules, equipping yourself with essential tools, and applying the right techniques, you can enhance your bike’s performance, ensure safety, and extend its lifespan.
Whether you’re tackling basic procedures, delving into advanced repairs, or caring for your e-bike, these tips will keep your ride smooth and reliable.
Remember, a well-maintained bike not only saves you money but also transforms every journey into a pleasurable experience. So gear up, stay proactive, and enjoy the open road with confidence!
Frequently Asked Questions (FAQs)
What are quick release bike components?
Quick release components are parts like wheels and seat posts designed with mechanisms that allow for easy removal and installation without tools, making bike maintenance and transport more convenient.
How often should I check my quick release levers?
It’s recommended to inspect your quick release levers before every ride to ensure they’re securely tightened and functioning properly.
What tools do I need to maintain quick release components?
Typically, you don’t need additional tools for quick releases, but having a reliable bike repair stand, a multi-tool, and a torque wrench can aid in comprehensive maintenance.
How can I prevent my quick release components from loosening?
Regularly check and tighten the quick release levers, ensure the components are clean and free from dirt, and consider using a thread locker if necessary.
Can I use quick release components on all types of bikes?
Quick release systems are common on many bikes, including road, mountain, and commuter bikes, but some high-end or specialized bikes may use alternative systems like thru-axles.


