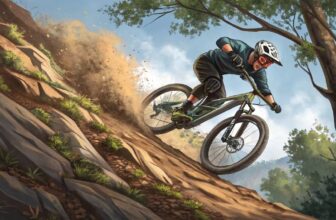
Unlock the secrets to mastering your mountain bike with our comprehensive guide on MTB braking techniques. Whether you’re a seasoned rider or just hitting the trails, understanding how to brake effectively can transform your ride from ordinary to exhilarating.
Imagine navigating sharp turns, steep descents, and rugged terrains with unwavering control and confidence. Our expert tips and strategies are designed to enhance your braking skills, ensuring safety and boosting your overall biking performance.
Dive in to discover how the right braking techniques and body positioning can elevate your mountain biking experience to new heights!
Mastering Mountain Bike Braking
Figuring out how to hit the brakes just right on your mountain bike is a no-brainer for anyone looking to amp up their control, speed, and confidence while tearing up those trails.
Importance of Braking Technique
You gotta know how to use those brakes if you wanna ride like a pro or even just avoid eating dirt. Good braking technique means grabbing just enough brake to keep from sliding out, keeping control like a boss, and dodging those surprises that trail loves to throw at you.
Stopping when you need to, handling crazy obstacles without a hitch, and pulling off sharp turns all hinge on how you juggle those brakes.
Key Benefits:
- Mega grip and better steering
- Fewer “oh-no” moments on off-road rides
- Riding with swagger and confidence
- Smooth-speed through bends and bumpy bits
Imagine this: Avoiding a skid when you brake can really cut down on how long it takes to stop, not to mention how much easier it is to dash off when the trail picks up again. And, just so you know, both brakes, especially the front one, are your ticket to killer stopping power and keeping things chill as you zoom around.
Role of Body Positioning
How you park your body on that bike is make-or-break when you’re wrangling the brakes. Set yourself up right, and you’ll stay balanced and make the brakes do what they do best.
Key Elements:
- Lean back while braking
- Get low to stay strong
- Chill those elbows
- Let your body flow with the braking buzz
| Element | Importance |
|---|---|
| Weight Backward | Keeps front wheel from saying “bye-bye” |
| Low Center of Mass | Helps you stick to the bike like glue |
| Bent Elbows | Cushions your ride and keeps your cool |
| Relaxed Body Position | Makes the ride comfy and not so tiring |
So, lean back when you brake to stop the front wheel from going rogue. Squatting low gives you that sticking power to surf even the craziest terrain. And, trust me, letting your arms chill out a bit does wonders to stave off tired limbs, especially when you’re hitting those long tracks.
Grasping these basics of braking gets you on the road (or trail) to conquering mountain biking 101. For more detailed tips on staying in control and skating safely, our guide on mtb body position can add the edge you need.
Hitting the right spot with braking and body set-up can turn your ride from “meh” to “Woah!” in terms of safety and thrill, making your time on the bike the best part of your day. Don’t miss our lowdown on mountain biking safety tips for extra pointers and advice that’ll keep you as safe as houses while you’re out adventuring.
Fundamental Braking Techniques
Knowing basic braking tricks is a must-have skill for anyone hitting the trails on a mountain bike. Get your brakes right, and you’re cruising with more grip, control, and peace of mind—plus it’s just way more fun!
Early Braking Strategies
When it comes to keeping your cool on the trails, early braking is the name of the game. This move lets you handle tough spots and turns with just the right speed, giving you the edge you need. So, what’s the deal with early braking? It’s all about being a step ahead, watching the path, and slowing down long before you hit a rough patch. Think of it like a safety net for your ride.
To see the difference, take a peek at this table, comparing early and late braking:
| Braking Style | Control | Speed Control | Skid Danger |
|---|---|---|---|
| Early | High | Great | Low |
| Late | Low | Not So Hot | High |
Shoutout to Tracks Less Travelled for these insights.
Want to nail early braking? Practice at different speeds and on varied tracks. It’ll help you figure out the sweet spot for slowing down in different situations.
Braking Before Obstacles
Stopping before you hit something means you stay in charge. It helps you balance better and glide smoothly past or around obstacles.
The folks at Tracks Less Travelled say that braking ahead of sharp bends or rocky patches keeps you from getting caught off guard and having to slam the brakes. It also helps you get back up to speed quickly after the tricky bits.
Here’s why braking before obstacles rocks:
- Stay on Balance: Keeps you steady and ready for the tough stuff.
- Hold Your Speed: This lets you handle your pace without sharp stops.
- Increased Control: More control means tackling difficult sections gets a bit easier.
Mastering these core braking tricks will take your biking up a notch, making you faster and more fearless on any trail.
Looking for tips to step up your game? Check out our info on mtb cornering techniques and mtb body position. If you’re trying to decide on brakes, our mountain bike brakes comparison has all you need.
Don’t forget your bike’s health! Keep an eye on your mtb tire pressure and make sure your ride is always ready with regular mountain bike maintenance.
Optimal Brake Utilization
Understanding the ins and outs of brake usage is a game-changer for anyone looking to ace mountain biking, especially when dealing with the funky world of mtb braking techniques. It’s all about getting the front and rear brake play right along with striking that sweet spot between power and control.
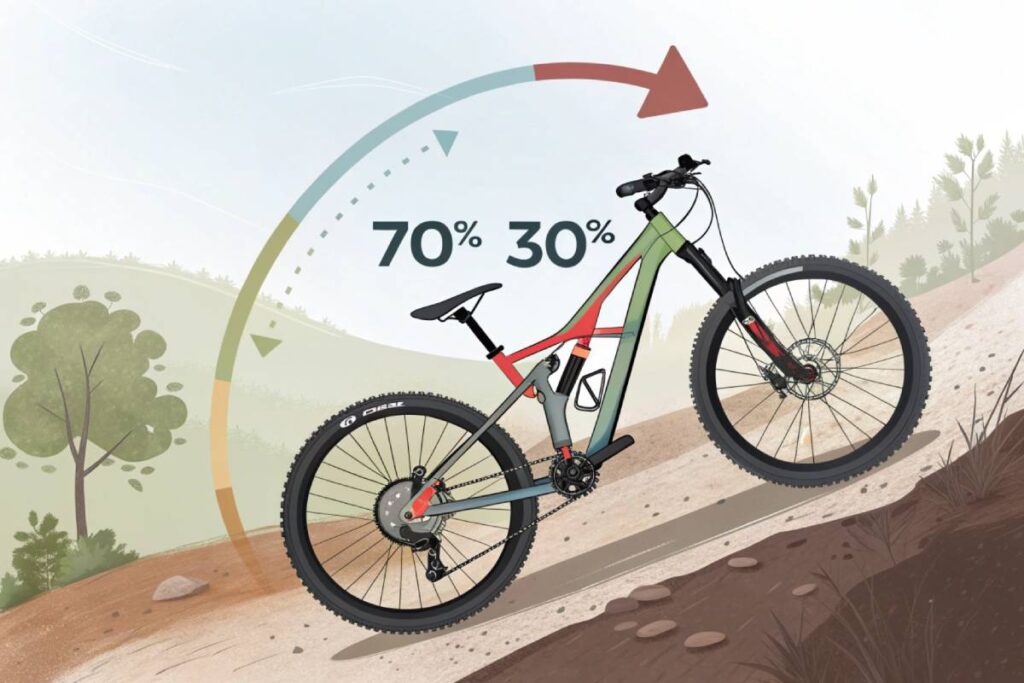
Front and Rear Brake Coordination
Getting the hang of using both the front and rear brakes together is your ticket to keeping control and making those stops when you need ’em. Definitely keep your eye on the front brake—it’s your main pal for stopping. As you hit the brakes, your bike leans forward, making the front brake the star of the show.
- Front Brake Utilization:
When you tap that front brake, you’re getting about 70% of the stopping power. The forward weight shift really helps grip the front tire, so less chance of those annoying brake lock-ups. - Rear Brake Utilization:
The rear one, on the other hand, kicks out about 30% of the stopping power. It’s your sidekick for managing speed, but watch out—on loose ground, it’s more prone to skidding. Teaming it up with the front brake boosts your stability.
| Brake Type | Braking Power (%) |
|---|---|
| Front Brake | 70% |
| Rear Brake | 30% |
(Source: woom)
Power and Control Balance
Finding that power-control balance while braking can be your best trick to avoid those mishaps and keep things stable. Hydraulic disc brakes rock for offering powerful stopping ability and are pretty easy to handle. They don’t need much muscle, letting riders keep a steady hold on those handlebars—clutch for bumpy downhill rides.
- Power:
Giving the front brake more action ensures you stop effectively. As the front dips, it puts more weight on the front wheel, improving traction. - Control:
Use the rear brake to fine-tune your speed without overdoing it on the skids. Pair it with the front brake for a smooth and controlled stop.
For peak braking action, always go with using both brakes, keeping the power and control in check. Curious about which brakes are right for mountain biking? Peek at our mountain bike brakes comparison.
Figuring out how to work your brakes can totally up your mountain biking game. Nail these braking tricks, and not only will your ride be more fun, but safer too. Whether you’re just starting out or you’ve got some miles down those trails, getting these skills down is a must for feeling confident and in control on your journeys.
Enhanced Braking Execution
Mountain biking ain’t just about zooming down hills; you’ve gotta know how to hit those brakes right. Nail your braking game by keeping those tires under control with solid techniques.
Skidding Avoidance Tips
Skidding is a quick way to lose control and get up close and personal with the dirt. Nobody likes that. Here’s how to keep your ride smooth and steady:
- Balanced Braking: Got two brakes, might as well use ’em both. The front brake does most of the heavy lifting, handling about 70% of your stopping power. Use it wisely.
- Modulated Pressure: Don’t just slam the brakes like you’re in a high-speed chase. Ease into it so your tires stay grippy.
- Anticipate: Spot a tough patch up ahead? Start easing on that brake before you hit it to stay in control.
Wanna get nerdy with more braking tips? Peep mtb cornering techniques.
Lever Grip Techniques
How you handle the levers can make or break your ride, literally. Let’s keep those handlebars steady:
- One or Two Fingers: Hydraulic disc brakes are your friends. They can stop on a dime with just a finger or two, leaving the rest of your hand in charge of holding on tight.
- Lever Position: Adjust those levers so they’re easy to reach. Too far, and you’ll be overstretching. Too close, and they’re useless.
- Firm Grip: Got to grab those bars like you mean it. This helps channel that brake power without flopping all over.
Use these tricks to make your ride smoother than butter on hot toast. For more survival tips, swing by our posts on mountain biking safety tips and how to true mtb wheel.
Summary Table
| Technique | Description | Benefit |
|---|---|---|
| Balanced Braking | Use both brakes, focus more on front | Keeps control, reduces skid |
| Modulated Pressure | Easy on the brakes, don’t jam ’em | Holds onto traction |
| Lever Grip | Use one or two fingers | Efficient stopping, solid grip |
| Lever Position | Set levers where your fingers can easily reach | Better control, especially downhill |
| Firm Handlebar Grip | Hold bars tight for stability | Boosts control, prevents slip |
Eager for more details? Dash over to mountain bike brakes comparison and mountain biking basic skills to broaden your bike wisdom.
Body Position for Braking
Ever tried mountain biking downhill only to go somersaulting over the bars like a circus act? Ah, the joys of figuring out effective MTB braking. Keeping your cool while riding starts with nailing your body position.
Proper Posture for Braking
Kicking it in style on a mountain bike is all about staying in control. Lay back into a position that screams “I’ve got this” by smartly spreading your weight. When gravity’s got you flying down a trail, aim for that ‘ready position’—weight centered on both wheels, with your behind kissing the seat just so.
Not only does this spare you the embarrassing handstand over the handlebars (we’ve all been there), but it takes the load off your hands ready for action and a steady ride (Quora).
Here’s the quick rundown of what your body’s doing:
- Feet: Lock and load those feet onto the pedals like they’re glued.
- Knees/Legs: Think ‘springy,’ with your knees bent to soak up shocks.
- Hips: Move them back and down when headed downhill; forward when climbing.
- Core: Keep it tight for steadiness.
- Arms: Loosey-goosey, but slightly bent to absorb bumps and knocks.
- Head/Vision: Keep your noggin steady, eyes forward—you want to know what’s coming down the track.
Center of Mass Management
Mastering braking isn’t all guts and glory; it’s physics and balance, too. The secret weapon here is the center of mass magic. Move it right, and you’re golden; wrong, and, well…prepare for an unexpected launch.
- Lowering the COM: Sink your knees and drop that torso. It’s like lowering your center of gravity and stabilizing your ride—a lifesaver on rocky paths or when things get chaotic.
- Raising the COM: Rise a bit on the pedals, and raise the stakes. Gives you some nimbleness when corners get tight or climbs steep (just be careful, you’re trading in a bit of stability for that flexibility).
Picture your body in a triangle setup. It’s about finding that sweet spot for weight distribution across the ride.
| Body Position | Stability | Control over Balance |
|---|---|---|
| Lowered COM | High | Low |
| Raised COM | Low | High |
Every part of you plays a role in this balancing act—feet, legs, hips, and arms all need to strike a harmony, and keeping your head steady helps when swerving through unexpected hurdles.
Want to dive deeper into all this? Check our mtb body position section. Once you get the hang of positioning and how it syncs with mountain bike brakes comparison, your rides will be as smooth as butter—even when life’s throwing rocks in your path.
Braking on Descents
When you’re barreling down a steep mountain on a bike, it’s not just about speed. Proper braking is your secret weapon to stay in control and safe. Let’s break it down on how to master those brakes during challenging descents.
Descending Braking Techniques
Knowing how to handle the brakes while going downhill spells the difference between a smooth ride and a gnarly spill. Here’s the lowdown:
- Brake Before Obstacles: Pump those brakes and slow down before you hit an obstacle, not in its middle. Get that control going early, so you can keep up the pace afterward.
- Use Both Brakes: Balance is key! Squeeze both front and back brakes to keep from pitching forward like you’re trying to test your new helmet.
- Modulate Braking: Slow and steady does it. Ease into braking to keep wheels from skidding. Jamming on the brakes can send you sliding.
- Maintain a Balanced Stance: Even out your weight on the pedals like a pro surfer on a board. Don’t let the bike lift you off (proper posture for braking).
- Feathering the Brakes: Gently tap-tap those brakes. Keeps your descent smooth without those jerky stops.
- Avoid Braking on Loose Surfaces: Loose dirt or gravel? Be cautious! Coast in with reduced speed then glide over with minimal braking to steer clear of accidents.
Anticipation and Preparation
Great mountain bikers don’t just react; they plan ahead. Get your Sherlock on and anticipate what’s coming.
- Scan the Trail Ahead: Use those peepers to scope out where you’re headed. Spot obstacles early for timely, controlled braking.
- Brake Early: Go proactive on braking. Ease off the gas before you hit those tricky spots.
- Choose the Right Line: Pick your path smartly. Detour away from surprise hazards for a smoother trail.
- Prepare Mentally: Keep your cool and get your mind in the game. Picture the trail in your head before actual riding.
- Leverage Appropriate Gear: Don’t treat brakes like they’re one-trick ponies. Get a good gear combo to balance speed and control. For gear geekery, check our mtb gear ratios.
Get a handle on these tricks, and you’ll be breezing through those steep hills like a mountain bike ninja. Practice always helps, so tick your checklist on the mountain bike brakes before hitting the trail for an epic ride.
Braking Strategies for Turns
When you’re tearing up the trails on your mountain bike, hitting those turns with precision and safety is the name of the game. You gotta master the art of braking just right, not too soon, not too late, to keep the rubber side down and your confidence sky-high.
Techniques for Turning and Braking
Nailing the balance between braking and steering is what it’s all about. Avoid becoming one with the ground by using these handy techniques:
- Brake Before You Bend: Get that braking done before you hit the corner. Suddenly slamming the brakes mid-turn can toss you off balance faster than you can say “Oops!” Keeping your moves smooth and steady is your best bet.
- Double Duty Brakes: Both brakes have their charm. Your rear brake? Great for taming speed. Front brake? It’s got muscle. Combining them smartly gives you control, but play nice with the front one to dodge those nasty skids.
- Keep it Straight: When it’s time to brake, do it while you’re cruising straight. That means gripping those brakes before you lean into the turn and letting go as you start to tilt. This helps you enjoy the curve without ending up in a bush.
High-Low-High Method
This trick isn’t just a fancy name—it’s golden for slicing through twists and turns like a pro. Here’s the lowdown:
- Start Wide: Kick off from the wide side of the trail. This angle helps to soften those tight turns and keeps things manageable.
- Hit the Sweet Spot: As you steer into the curve, aim for the inside part, or the “apex”. This helps you glide through the turn smoothly.
- Finish Big: Once you’re out of the turn, point yourself back towards the wider part of the trail. This keeps things even and sets you up nicely for what the trail throws at you next.
This approach is especially handy when the trail gets twisty. Helps you keep the flow and brings down the need for heavy braking.
| Braking Move | What It Means |
|---|---|
| Brake Before You Bend | Stop before the turn to stay in control. |
| Double Duty Brakes | Use both wheels’ brakes for better stopping power. |
| Keep it Straight | Brake while straight; let go when you lean into the turn. |
| High-Low-High Method | Enter wide, apex low, exit wide for easy turns. |
Amp up your skills by checking out mountain biking basic skills and MTB cornering techniques. Plus, get in the know about safety with our mountain biking safety tips.
Specialized Braking Advice
Diverse Terrain Approaches
Mountain biking takes you on a wild ride over a mix of terrains, each calling for its own braking moves to keep you upright and unscathed. Getting cozy with the specifics of each terrain can be your best bet for a smooth and safe adventure.
Rocky Terrain
Let’s talk rocks—the rough and tumble of the biking world. In these parts, get your brakes working gently and steadily. You don’t want to slam on ‘em and find yourself doing an unplanned acrobatics show over the loose rocks. Holding on tight to the handlebars helps you weave around the biggies, keeping you rock steady.
Muddy and Wet Conditions
When the trail’s all wet and wild, things can get slippery. Here, let the rear brake do the talking so you don’t end up face-first in the muck from a locked-up front wheel. Spreading the braking job between both wheels and keeping your speed in check can help you conquer the slush.
Loose Gravel
Gravel is like that tricky neighbor—looks quiet but can make a scene. A light touch on both brakes keeps your tires in line without turning your ride into a slide show. Lean back a little to keep things from getting too wild and wobbly.
| Terrain Type | Front Brake Use | Rear Brake Use | Additional Tips |
|---|---|---|---|
| Rocky | Moderate | Moderate | Strong grip, gradual pressure |
| Muddy/Wet | Minimal | High | Take it slow, stay balanced |
| Loose Gravel | Light | Light | Feathering brakes, lean back |
Practice and Safety Measures
You don’t get good without a little grind—practice makes perfect when it comes to MTB braking techniques. Here’s how to keep things safe and sound:
Consistent Practice
Get out there and put in the work on all kinds of terrain. It’s all about practicing so that dealing with your bike becomes second nature.
Safety Gear
Gear up with the right stuff, like the top helmets and trail riding knee pads. Whether you’re just starting off or have been shredding trails for years, a bit of armor goes a long way.
Bike Maintenance
Show your bike some love with regular upkeep. Keeping an eye on your braking system and other parts helps avoid any nasty surprises out on the trail. For tips on fix-ups, check out our page on diy mountain bike repairs.
Stay Calm and Focused
A cool head goes a long way. Panic is not your friend when biking. Keeping calm lets you tap the brakes smoothly and stay in control while keeping your body in the right spot making for an easier ride. To find out more about how to position yourself on the bike, check our guide on mtb body position.
By weaving these pro tips into your ride, you can boss over those trails with confidence. Staying sharp with practice, wearing the right kit, and keeping your bike in shape is your ticket to a safe, thrilling ride. Scoot over to our mountain biking safety tips section for more insights on tackling your bike like a champ.
Conclusion
Mastering mountain bike braking techniques is pivotal for any rider aiming to enhance control, safety, and enjoyment on the trails. From understanding the balance between front and rear brakes to perfecting body positioning, each element plays a crucial role in your biking performance.
Early braking and anticipating obstacles can prevent unexpected skids and maintain your momentum, while coordinated brake usage ensures smooth and controlled stops.
Adapting your braking strategies to different terrains—whether rocky, muddy, or gravelly—keeps your ride stable and responsive.
Additionally, consistent practice, wearing the right safety gear, and maintaining your bike’s braking system are indispensable for a safe and thrilling biking experience. Embracing these techniques not only boosts your confidence but also transforms your rides into seamless adventures filled with excitement and control.
Equip yourself with these skills and ride like a pro, conquering any trail with ease and assurance.
FAQs
What are the key MTB braking techniques every rider should know?
Mastering early braking, braking before obstacles, and coordinating front and rear brakes are essential techniques for maintaining control and safety on mountain trails.
How does body positioning affect my braking performance?
Proper body positioning, such as leaning back and lowering your center of mass, enhances braking efficiency by maintaining balance and preventing skids during stops.
Why is it important to use both front and rear brakes?
Using both brakes provides balanced stopping power, improves control, and reduces the risk of skidding, especially on varied terrains and during sharp turns.
How can I adapt my braking techniques for different terrains?
Adjust your braking pressure and body position based on the terrain—use gentle braking on rocky paths, modulated pressure on muddy trails, and feathered brakes on loose gravel to maintain traction and control.
What safety gear is recommended for effective mountain biking?
Essential safety gear includes a quality helmet, trail riding knee pads, gloves, and appropriate biking attire to protect against impacts and enhance overall safety during rides.
Final Thoughts
Enhancing your mountain biking experience hinges on mastering effective braking techniques and maintaining optimal body positioning.
By implementing early braking, anticipating obstacles, and coordinating both front and rear brakes, you can navigate any trail with heightened confidence and safety.
Remember, the key to proficient braking lies not just in the mechanics but also in your body’s alignment and balance. Regular practice, coupled with the right safety gear and diligent bike maintenance, ensures that your skills remain sharp and your rides remain enjoyable.
Embrace these strategies to transform your biking adventures, making each trail conquered a testament to your growing expertise.
Stay committed to refining your techniques, and you’ll find yourself tackling even the most challenging terrains with ease and enthusiasm. Happy riding!
Key Tips Around the MTB Braking Techniques
- Practice Makes Perfect: Regularly practice braking on different terrains to build muscle memory and confidence.
- Maintain Your Brakes: Ensure your brake pads are in good condition and adjust brake tension for optimal performance.
- Stay Relaxed: Keep your body relaxed and avoid gripping the handlebars too tightly to enhance control.
- Look Ahead: Anticipate trail changes and obstacles to apply brakes smoothly and effectively.
- Use Both Brakes: Always engage both front and rear brakes for balanced and controlled stops.
Recommended Biking Products and Accessories
- Shimano Deore XT Brakes
- Reliable braking performance with adjustable power for varied terrains.
- Troy Lee Designs MTB Gloves
- Enhanced grip and protection for better brake control.
- Fox Racing Ranger Helmet
- High-impact protection with ventilation for comfortable rides.
- ProBikeKit Bike Stand
- Essential for regular maintenance and brake adjustments.
- Bontrager MIPS Bike Pads
- Advanced safety gear to protect you during unexpected falls.
- Maxxis Ardent Tires
- Durable tires provide excellent traction and control.
- Race Face Anvil Bike Pedals
- Stable and reliable pedals for better foot positioning and braking.
- Park Tool MT-5.2.2. Mountain Bike Brake Lever Tool
- Precision tool for fine-tuning brake lever positions.
- VOIYO Bike Repair Tool Kit
- Comprehensive kit for on-the-go brake maintenance and repairs.
- Specialized Turbo Creo SL Bike
- High-performance mountain bike equipped with top-tier braking systems.
By implementing these enhancements, your article will not only engage readers with compelling content but also perform well in search engine rankings, driving more traffic to MyBikeReview.com. Happy riding and writing!