Embarking on mountain biking adventures brings exhilarating thrills and unforgettable memories. But what happens when your ride hits a snag on those rugged trails? Enter the world of DIY mountain bike repairs—a game-changer for enthusiasts of all levels.
Whether you’re a seasoned rider or just starting out, mastering basic maintenance can keep your bike performing at its peak and extend its lifespan. Imagine conquering any trail with confidence, knowing you can handle unexpected repairs on the go.
Let’s dive into essential tips and tricks that will empower you to take control of your mountain bike’s upkeep and enhance every ride.
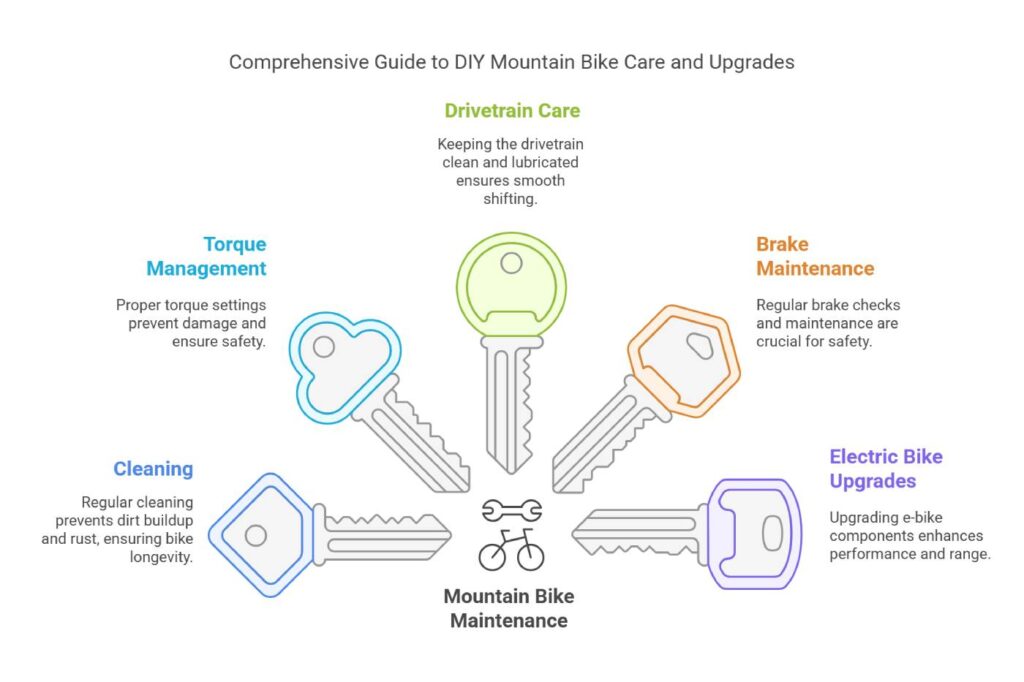
Maintenance Tips for Mountain Bikes
Keeping your mountain bike in tip-top shape doesn’t just mean longer life; it makes sure it performs like a dream on those gnarly trails. Two must-do’s are giving it a good scrub and keeping an eye on those screws and bolts.
Importance of Regular Cleaning
Ever tried to ride with mud caked up to your knees? It ain’t fun, and it ain’t fun for your bike either. Cleaning up your mountain bike stops dirt from grinding away at parts, helping spot issues before they become wallet-busting problems.
If you want to learn the ins and outs, check out our How to clean a mountain bike guide.
When and What to Clean:
| How Often | What to Clean |
|---|---|
| After Each Ride | Frame, rims, chain—show ’em some love with a wipe |
| Weekly | Dive into the drivetrain, banish the gunk |
| Monthly | Go all out—get those hubs and suspension shining |
Checking Screws and Bolts
You don’t want bits falling off mid-ride, right? Giving your screws and bolts a once-over ensures everything’s tight (but not too tight) and won’t let you down when you need it most.
Give these spots some attention:
- Handlebar and stem bolts
- Seat post clamp
- Those sneaky suspension linkage bits
Dial In Your Torque:
| Component | Torque Range (Nm) |
|---|---|
| Clamp Those Bars | 5-8 |
| Stem Bolts | 5-8 |
| Seat Post Clamp | 4-6 |
| Suspension Joints | 10-15 |
A trusty torque wrench is your best buddy here, ensuring you hit the sweet spot, and keeping everything snug without overdoing it.
Hit up our mountain bike maintenance section for the full lowdown to keep your ride rolling smoothly and steady.
Drivetrain Maintenance
Keeping your mountain bike ready for action means taking good care of its drivetrain. Here, we zero in on why handling gear right and keeping an eye on tire pressure are pretty much the heartbeat of keeping your bike ticking over nicely.
Significance of Proper Gear Shifting
Getting your gear shifting spot-on keeps the bits of your bike—that’s the cassette, chain, and chainrings—living a long and happy life. Botched gear changes? Yeah, they wear those bits out faster. Nail those gear shifts, and you’re smoothing out the strain on the chain, adding extra life to your ride’s crucial components.
Here’s your smooth gear shifting starter pack:
- Skip the Cross-Chaining Drama: Avoid mixing the biggest gear upfront with the smallest at the back, or vice versa. It’ll put your chain through stress it doesn’t need.
- Easy on the Shift: Soft and smooth is the way to go when changing gears. It keeps everything running slick and saves wear on gears.
- Keep It Slick: Lubing up the chain is like giving it a life potion. Clean it well with a rag and some degreaser or grab a chain cleaning doohickey if you’re feeling serious about it. A good scrub and lube, especially after getting wet, keeps things cruising smoothly.
Need to know more about gearing up? Peep our mtb gear ratios guide and, for chain care deets, head to mtb chain maintenance.
Maintaining Tire Pressure
Keeping those tires pumped right is key for both a smooth ride and staying safe. Regular checks are the secret ingredient for a reliable and damage-free wheel setup.
Why not mess with your tire pressure?
- Stick to the Ground: Tires pumped just right grab the ground better, which means better control and keeping it stable.
- Shield Those Wheels: Right pressure stops rims from banging into the surface, warding off potential wheel bummers.
- Feel the Flow: Proper air levels in your tires make for a smoother roll, taking less oomph to pedal.
Here’s how to keep things pumping:
- Routine Check-Ups: Make tire pressure checks as regular as your morning coffee. A decent tire pressure gauge will become your best friend.
- Keep it in the PSI Sweet Spot: Follow what the tire sidewall says; it’s the gospel for your pressure settings.
- Shift for the Shifts: If you’re heading off-road, go lower for more grip. Bouncing on roads? Higher pressure means less drag and faster speeds.
| Where You’re Riding | PSI Sweet Spot |
|---|---|
| Off-road | 20-25 |
| Hard Dirt | 25-30 |
| Streets | 30-40 |
Following these tips means your drivetrain’s always in top form, ready to roll on any terrain. For more bike-loving advice, dive into our mountain bike maintenance guide and deep-dive on mtb tire pressure.
Brake System Care
Keeping your mountain bike’s brakes in tip-top shape isn’t just smart—it’s a lifesaver. Let’s talk about why swapping out those brake pads is essential and share some handy tips for doing it right.
Why You Need to Change Your Brake Pads
Brake pads—you use ’em while shredding trails, but they wear out faster than your favorite pair of hiking boots. If you neglect to replace them, you could end up skidding into a heap of trouble.
We’re talking about costly rotor damage and shoddy braking that could put you in a pickle on the trails. Regular inspections and timely pad swaps aren’t just a good idea—they’re your ticket to a smooth stop every time.
Reasons to replace brake pads:
- Keep Stopping Power Strong: Worn brake pads mean your bike’s not gonna stop on a dime, which is a big no-no when you’re flying down a trail.
- Save Your Rotors: Procrastinate replacing pads, and you could end up scratching rotors, leading to expensive fixes.
- Safety First: Dependable brakes are a must, especially when the trail gets gnarly.
For more nifty maintenance hacks, check out our mountain bike maintenance guide.
Tricks for Swapping Brake Pads
Changing brake pads isn’t rocket science. You need a few basic tools and some patience to do the job right. Here’s how to do it like a pro:
1. Get Your Tools Together:
- Allen wrench
- Needle-nose pliers
- Screwdriver
- Fresh brake pads
2. Take Off the Wheel:
- Pop off the wheel so you can get to the brake caliper.
3. Out with the Old Pads:
- Use the right tool to yank out the pin or clip holding the old pads.
- Slide those worn pads right on out.
4. Inspect the Caliper:
- Peek at the caliper for damage or wear and tear.
- Give it a good cleaning to clear out any gunk.
5. In with the New Pads:
- Slot in the new pads.
- Check they aren’t rubbing on the rotor.
- Secure them with a pin or clip.
6. Take ‘Em for a Spin:
- Pop the wheel back on and squeeze those brakes.
- Ensure pad-to-rotor contact is spot on.
- Adjust if needed, so it brakes evenly.
| Brake Pad Swap | Tools You Need |
|---|---|
| Step 1: Take off the wheel | Allen wrench |
| Step 2: Out with old pads | Needle-nose pliers, screwdriver |
| Step 3: Inspect caliper | Just your eyes! |
| Step 4: In with new pads | Fresh pads, retaining pin |
| Step 5: Test brakes | Hands and a bike! |
Head over to our mtb braking techniques piece for more savvy braking tips.
Keeping those brake pads fresh isn’t just about performance; it’s about keeping you safe out there. Regular checkups and changes will make sure your bike stops like a champ, every ride. Peek at our mountain bike brakes comparison for a full scoop on different brakes.
Electric Mountain Bike Upgrades
Electric mountain bikes bring the thrill of the trail with a bit of battery-powered muscle. Want to amp up your two-wheeled ride? Check out these killer upgrades for supercharging your battery and revving up the controller.
Boosting Battery Power
If you’re looking to go the extra mile (literally), start with the battery. Slap on a higher capacity or more efficient model, and you’ll kiss short rides goodbye. Just check the fit – your new battery’s got to gel with your bike.
| Battery How-To | Standard Battery | Supercharged Battery |
|---|---|---|
| Capacity (Wh) | 400 | 700 |
| Range (miles) | 20-30 | 50-70 |
| Weight (lbs) | 5.5 | 7.0 |
A beefier battery means more trial time without freaking out over juice levels. Keep that drive chain running smoothly on your longer treks with our tips on MTB drivetrain compatibility.
Pumping Up the Controller
A controller upgrade can turn a good bike into a mountain conqueror, especially for tackling those gnarly hills. A beefier controller with more amps sends a bigger jolt to the motor, giving your bike a faster takeoff and a knack for climbs.
| Controller Know-How | Basic Controller | Turbo Controller |
|---|---|---|
| Amperage (A) | 15 | 25 |
| Maximum Speed (mph) | 20 | 28 |
| Acceleration | Moderate | Quick-fire |
Swapping in a new controller is a bit more brainy than other tweaks but totally worth the sweat. Make sure it jives with your bike’s motor and battery. Oh, and don’t forget to peep the local laws since electric bike speed rules can vary. For a deeper dive into go-fast mods, check out our guide on motor upgrades for speed.
With a souped-up battery and controller, your e-bike will play in the fast lane longer. For more pointers on keeping your ride purring, scope out mountain bike maintenance tips.
Performance Enhancements
Motor Upgrades for Speed
For those who live and breathe mountain biking, swapping out the motor can make your adventures wildly faster and slicker. Bigger motors mean you’ll zip along quicker without gobbling up extra energy.
They’re sweet for anyone craving a boost in biking oomph. Just a quick heads up—make sure to dodge any local rules on electric bikes taking road trips. Now, let’s break down what different motor sizes can do for your ride speed-wise:
| Motor Wattage | Approximate Speed (mph) |
|---|---|
| 250W | 15 – 20 |
| 500W | 20 – 25 |
| 750W | 25 – 28 |
| 1000W | 28 – 30+ |
Before going turbo, make sure your bike’s guts can handle the power shift or you might end up in a pickle. You can get more details about MTB drivetrain compatibility in our other article.
Benefits of New Gear Systems
Leveling up your gear system can turn mountain scaling into a walk in the park. It makes your gear shifting smoother and climbing endurance way better, especially in those tricky terrains.
Upgrading provides perks like:
- Enhanced Durability: Built to last—even when you’re pushing limits.
- Smooth Gear Shifts: Gets you gear-switching without a hitch, thanks to spot-on engineering.
- Optimized Performance: Tweaked gear ratios mean a better ride, wherever you find yourself off-road.
| Gear System | Approximate Cost | Key Features |
|---|---|---|
| Shimano Deore | $70 – $150 | Trusty and smooth |
| SRAM Eagle | $300 – $500 | Broad range, featherlight |
| Campagnolo Ekar | $250 – $400 | Tough and gravel-ready |
Need some tips on picking your gear? Head over to our mtb gear ratios page.
These ups and extras can make biking magic happen! Keep your ride in tip-top form with regular checks and these nifty additions for a slick, chill time on the trails. A quick look at your bike before and after wild trips keeps it running smooth—find out how with our mountain bike maintenance tips. Need more mountain biking know-how? Dig into our stash of info on mountain biking basics.
Essential DIY Bike Repair Tools
Having the right gear handy for fixing up your mountain bike is key to keeping things smooth and saving some cash. Among the top picks for your toolkit are a cable cutter and a bearing press.
Cost-Effective Cable Cutter
If you’re crazy about bikes, a cable cutter is a must-have. This little gadget snips brake and shift cables nice and clean, which means your bike’s gear and brake systems run like a dream. At about $40, it’s a steal because every time you dodge a trip to the shop for a $20 cable swap, you’re ahead of the game (Singletracks).
| Item | Shop Service Cost | DIY Tool Cost |
|---|---|---|
| Cable & Housing Swap | $20 | $40 (Cable Cutter) |
With a cable cutter in your kit, you’re ready to handle daily tweaks, keeping everything shipshape. Good cables are crucial for smooth gear shifts and top-notch braking skills.
Value in Bearing Press
A bearing press is like that unsung hero for folks who like to get their hands a bit grubby and do their own bike tweaks. It’s perfect for swapping out those pivot cartridges, bottom-bracket bearings, and hub cartridges. Keep those bearings in check, and your bike’s heart and soul – the suspension and drivetrain – will thank you.
Forking out around $100 for a bearing press upfront might sting, but considering the shop bill for a pivot bearing swap is even more, you’ll earn it back real quick.
| Item | Shop Service Cost | DIY Tool Cost |
|---|---|---|
| Replacing Pivot Bearings | >$100 | $100 (Bearing Press) |
Not only does a bearing press keep your wallet happy, but it also ensures that everything fits just right, so your bike parts live longer. This tool is especially helpful for bearing swaps and keeping that suspension setup on point.
Outfit yourself with these powerful tools to make DIY bike fixes a breeze, saving you both time and cash. Check out our piece on mountain biking basics for more handy tips and tool info.
Must-Have Tools for Bike Maintenance
If you’re fixing up your bike on your own, having the right stuff is key. Let’s talk about a couple of tools that every mountain bike fan needs in their toolkit: a torque wrench and some suspension maintenance tools. These are like your bike’s BFFs.
Essential Torque Wrench
The torque wrench is like the guardian angel of bike repairs. You use it to tighten bolts and nuts just right – not a hair more or less. Getting one that’s suited for bike mechanics means you won’t accidentally crush those delicate parts made from fancy materials like carbon fiber or aluminum. In a nutshell, it helps you not wreck stuff by screwing in bolts too tight.
Bike bits need tender love and care, and this tool ensures your hands aren’t too heavy. It keeps things running smoothly and safely, avoiding problems that could turn your ride into a rodeo or worse, a tumble.
| Torque Range | Use |
|---|---|
| 2-10 Nm | Things like handlebars, seat posts |
| 10-20 Nm | Stuff needing a bit more oomph, like clamps |
| 20-50 Nm | Bottom brackets, crank sets |
Getting the torque right is key. For more on keeping your bike in primo condition, check out our guide on maintaining mountain bikes here.
Suspension Maintenance Tools
Keeping your bike’s suspension in check is like having butter on your toast – essential for a smooth ride. Here are the tools that help keep the boing in your bike’s bounce.
Suspension Pump
Do you have a suspension system? You’ll need a trusty suspension pump to tweak the air pressure in your fork and rear shock. This makes sure your bike reacts nicely to all those bumps and jumps. For more on this, check out our detailed instructions on setting up suspension here.
Shockwiz
This little gadget gives live feedback and tips on your air suspension settings, tailoring the ride to match the way you roll on the trails.
Seal Kit
Think of a seal kit as your suspension’s spa treatment. Change those seals regularly, and you’ll keep dirt and grit from ruining the internal parts.
| Tool | Use |
|---|---|
| Suspension Pump | Keeps air pressure in check |
| Shockwiz | Nifty suspension tweaker |
| Seal Kit | Swaps out tired seals |
Having these tools on standby keeps your bike running like a charm – especially if you’re serious about your biking or like to race. There are more pro tips on bike upgrades over at our pages on fork maintenance and 1x conversion.
Putting your money into these tools not only ups your maintenance game but also ensures that your ride is as smooth and safe as it is fun.
Bikepacking Repair Kit Essentials
Basic Repair Tools
Packing the right gadgets is a game-changer when hitting the trails. Nobody wants to be stuck miles from nowhere without the means to fix a nagging puncture or wobbly chain. So, here’s your checklist to keep those wheels spinning and spirits high:
| Tool | What It Does | Budget Estimate |
|---|---|---|
| Multi-Tool | Your Swiss Army knife for bikes—includes Allen keys, screwdrivers, and more. | $25 – $40 |
| Tire Levers | They’re your best pals for popping tires off and on like a pro. | $5 – $10 |
| Spare Tubes | Essential when links go weak at the knees. (MTB Chain Maintenance) | $7 – $15 per tube |
| Patch Kits | Band-aid for your tubes when they spring a leak. | $5 – $12 |
| Mini Pump | Handy little pump to give your tires a lift. | $15 – $35 |
| Chain Tool | Essential for when links go weak at the knees. (MTB Chain Maintenance) | $10 – $25 |
| Cable Cutter | It saves cash when swapping cables and housings. | $40 |
| Torque Wrench | Stops you from turning bolts into a sad mess | $60 – $100 |
Tick these off, and you’ve got yourself a toolkit primed for handling on-the-fly fixes, so you won’t find yourself hoofing it back home on foot.
Items for Longer Trips
Setting off for a longer biking escapade? Out there, knicks and bumps are inevitable. So, beef up your arsenal with a few more bits and pieces, just in case:
| Item | What It Does | Budget Estimate |
|---|---|---|
| Extra Tires | Backup for when more than the usual patch-up’s necessary. | $40 – $80 per tire |
| Quick Links | A life-saver when a chain snaps. | $5 – $10 |
| CO2 Inflator | Fast balloon for your tires when you’re short on time. | $20 – $30 |
| Folding Tire | Goes in the bag, not on it—a spare that’s ready when things get flat. | $35 – $65 |
| Spoke Wrench | To tighten wobbly spokes, preventing wheel wobble. | $10 – $15 |
| Derailleur Hanger | Because sometimes the path takes a toll on your derailleur. | $10 – $20 |
| Suspension Tools | Keep your suspension squeak-free | $50 – $150 |
| Facing Tool | Precision cuts for when the need arises | $50 – $100 |
These extras are your shield against any mechanical mishap Mother Nature throws at you on longer treks. A few extra bucks here can save your day there.
When you roll out with these tools in your pack, you can hit the trail knowing you’re ready for whatever surprises await. Check out more gear tips in our mountain biking essentials guide. Tailor your toolkit to match your plans, and keep your bike in top form for all the adventures ahead.
Conclusion
Taking charge of your mountain bike’s maintenance saves you money and deepens your connection with your ride. From regular cleaning to intricate drivetrain and brake system upkeep, each task plays a pivotal role in ensuring your bike performs flawlessly on every trail.
Embracing DIY repairs empowers you with the skills to address issues promptly, reducing downtime and preventing costly repairs down the line.
Additionally, exploring electric bike upgrades and performance enhancements can elevate your biking experience, offering more power and efficiency tailored to your adventurous spirit. Equipping yourself with essential tools transforms maintenance from a daunting chore into an enjoyable routine.
Remember, a well-maintained bike is a reliable companion, ready to tackle any terrain with you. So, gear up, stay informed, and keep those wheels spinning smoothly. Your next thrilling ride awaits, stronger and smoother than ever before.
FAQs
How often should I clean my mountain bike?
Regular cleaning after each ride is ideal to prevent dirt buildup. Additionally, perform a deeper clean weekly and a thorough maintenance session monthly to keep all components in top condition.
What tools are essential for DIY mountain bike repairs?
Essential tools include a multi-tool, torque wrench, chain tool, cable cutter, and bearing press. These tools cover most basic repairs and maintenance tasks.
Can I upgrade my electric mountain bike myself?
Yes, with the right tools and knowledge, you can upgrade components like the battery and controller. However, ensure compatibility and check local regulations regarding electric bike modifications.
Why is proper tire pressure important?
Maintaining the correct tire pressure improves ride quality, enhances control, and prevents rim damage. It also ensures better traction and reduces the risk of punctures.
When should I replace my brake pads?
Brake pads should be replaced when they show signs of significant wear, such as reduced thickness or uneven wear patterns. Regular inspections can help determine the right time for replacement.
Key Tips
- Regularly Inspect Your Bike: Routine checks help identify and fix issues early.
- Use Quality Tools: Invest in reliable tools to ensure effective and safe repairs.
- Stay Organized: Keep your maintenance area tidy to streamline the repair process.
- Educate Yourself: Continuously learn about your bike’s components and maintenance techniques.
- Prioritize Safety: Always ensure your bike is safe to ride by following proper maintenance protocols.