
Have you ever felt your bike slipping just when you needed it most or heard that annoying squeak mid-ride? It’s time to unlock your bike’s true potential with essential freehub maintenance hacks!
Whether you’re a seasoned cyclist or just hitting the trails, understanding and maintaining your freehub can transform your riding experience.
Dive into our comprehensive guide to keep your wheels spinning smoothly and your performance at its peak.
Understanding Freehub Basics
If you’re into cycling and keen on keeping your bike in tip-top shape, you must understand how a freehub works. In this section, we’ll break down what makes a freehub tick, cutting through any mystery surrounding this all-important piece of equipment.
Anatomy of a Freehub
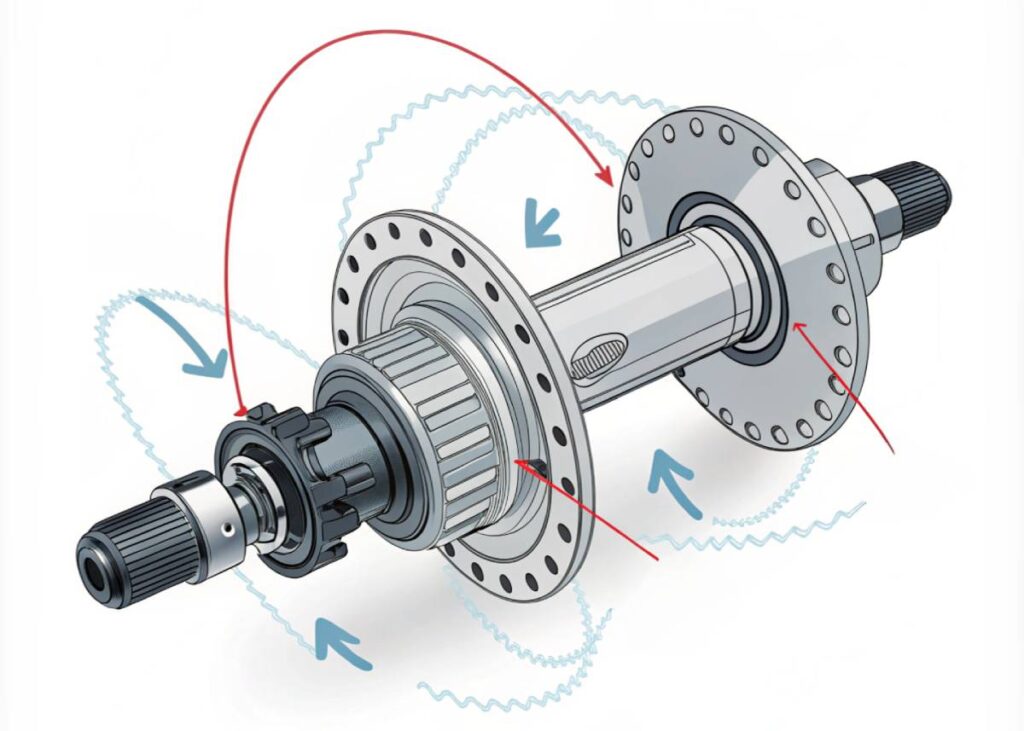
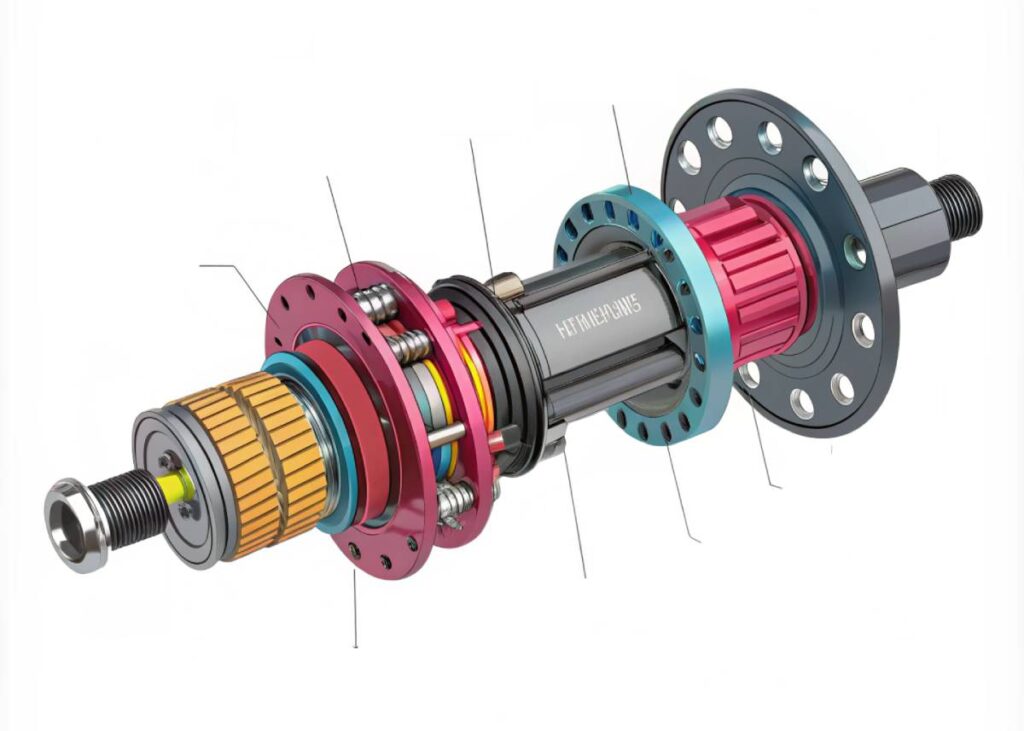
The freehub’s like the unsung hero on most road and mountain bikes with derailleurs. It clings to the rear hub and clutches onto the cassette cogs using a splined cylinder. Nestled inside the freehub body, you’ll find the key players: bearings, ratcheting teeth, and pawls.
| Component | Description |
|---|---|
| Freehub Body | Home to bearings, ratcheting teeth, and pawls. |
| Bearings | Keep things rolling smoothly. |
| Pawls | Act like tiny spring-loaded levers that lock into the ratcheting teeth. |
| Ratcheting Teeth | Fixed teeth in the hub shell that the pawls latch onto. |
The main gig for the freehub body is to keep things moving forward while letting you coast when you stop pedaling. The cassette cogs just hang around; it’s the freehub that’s hustling behind the scenes.
“The freehub is the backbone of your bike’s drivetrain. Understanding its components can significantly enhance your maintenance routine.”
— Alexandre Giroux, Professional Cyclist
The function of a Freehub
The freehub’s job is simple but vital: it’s the middleman in transferring the oomph from your pedaling to the rear wheel. This trick is pulled off with spring-loaded pawls and ratcheting teeth. Kick those pedals, and the pawls latch onto the ratcheting teeth snug in the hub shell, pushing the wheel forward. Stop pedaling, and the pawls chill out, letting the wheel spin easy-peasy.
How a hub hooks up pawls and ratchet teeth can vary quite a bit, leading to different ways it engages. For instance, if a hub’s got two pawls meeting 36 ratchets, you’re looking at a 10-degree angle until engagement clicks in – meaning you’ll start moving along faster once you begin pedaling.
| Engagement Points | Pawls | Ratchets | Angle of Engagement |
|---|---|---|---|
| 72 | 3 | 24 | 15° |
| 108 | 4 | 27 | 13.5° |
| 216 | 6 | 36 | 10° |
Knowing the freehub’s groove gives cyclists a better idea of why it matters in getting power to the wheels and keeping rides smooth. For more in-depth bike fixes, take a gander at our detailed bike repair guides.
The freehub’s sturdy and a step up from the old ‘freewheel’ systems. Keep it going strong with regular bike bearing maintenance and spit-polish it with some lubrication. Check our bike maintenance schedule to keep your ride spinning like a dream.
“A well-maintained freehub ensures efficient power transfer and a smooth cycling experience, making it indispensable for both casual riders and pros.”
— Jamie Driscoll, Bike Industry Expert
Freehub Maintenance Importance
Significance of Regular Maintenance
Keeping your bike’s freehub well-tuned might sound like an optional extra, but trust us, it’s essential for a smooth ride. A lubed-up freehub makes your pedaling silky, hushes those squeaky noises, and won’t wear out your bike parts quicker than you can say ‘chain reaction’. By checking in with your bike’s freehub every so often, you dodge problems like slip-sliding gears, stubborn pawls, and rust making a meal of the insides.
| Benefit | Description |
|---|---|
| Enhanced Pedaling Efficiency | You push, it moves — losing less oomph along the way. |
| Noise Reduction | No more sounding like a mouse caught in a blender. |
| Component Longevity | Saving wear and tear for your sneakers, not your drivetrain. |
Sparing a few moments for freehub care is really about investing in your future self’s cycling joys, especially for those who zoom for sport or hop on their bike to work every day. If you’re hungry to dive deeper, we’ve got a bike bearing maintenance guide just for you.
Impact of Neglecting Maintenance
Skip over Freehub TLC, and your bike might throw a tantrum, leaving you regretting skipping those few easy checkups. Get ready for rough rides, ear-piercing squeals, or face the catastrophe of a busted drivetrain. Here’s what might rear its ugly head:
- Rough Pedaling: When lubrication dries up and grit gets cozy, pedaling might start feeling like pushing a boulder uphill.
- Noise: Dirt or dryness turns your trek into a cacophony of groans and grunts.
- Drivetrain Failure: Ignore it long enough, and your bike might just quit on you in a spectacular fashion.
| Neglect Issue | Resulting Problem |
|---|---|
| Poor Lubrication | Makes pedaling about as easy as marching in mud. |
| Debris Build-Up | Your bike’s way of singing the blues. |
| Corrosion | The ultimate bike diva meltdown. |
Keeping your bike running smoothly, especially after taking it through muddy trails or giving it the cold shoulder for a while, comes down to making bike care a habit. Check your calendar with a bike maintenance schedule and grab one of the best bike lubricants out there to pamper that freehub right.
For more ways to keep your two-wheeled friend happy, don’t miss sections on cleaning that filthy chain, giving the rear derailleur a tune-up, and adjusting the front derailleur like a pro.
Servicing Different Freehub Brands
Keeping freehubs in tip-top shape is key to ensuring your bike rolls like it should. Each brand has its own quirks and tricks for upkeep, so let’s dig in.

Shimano® Freehub Maintenance
Shimano® hubs are like a mini treasure chest with loose ball bearings, pawls, and springs. They’re not huge fans of full teardowns since parts like pawls and springs aren’t easy to replace. But hey, those little ball bearings can be swapped out when needed.
Here’s how to spruce up a Shimano® freehub:
- Yank off that rear wheel.
- Time to get the cassette off using your trusty cassette removal tool.
- Out come the axle and bearings.
- Give the freehub body and bearings a good cleanse with a degreaser.
- Slap on a thin coat of grease for the bearings and put it all back together.
Want the nitty-gritty details? Check out our service bike hub guide.
Campagnolo® Freehub Maintenance
Do you have a newer Campagnolo® freehub like the Centaur or Record? You’ll be locking the left axle with a 5mm Allen key before twisting the right locknut to freedom. Older models or relics like the Mirage might have a little grub screw to fiddle with before taking off the locknut.
Here’s how to give a Campagnolo® freehub some love:
- Off with the rear wheel, and lose the cassette.
- Hold the axle on the left with a 5mm Allen key.
- Twist that right locknut until the freehub pops off.
- Scrub down the freehub parts with a degreaser.
- Grease it up lightly, paying close attention to how those springs and pawls fit in before putting it all back.
Need finer details? Peep our article on bike bearing maintenance.
Brand-specific Considerations
No two brands are exactly alike, you know. Here’s what to keep an eye on:
- Grease It Up: A little grease and oil go a long way. Brands sometimes have their favorite greases for the job. For the lowdown, our best bike lubricants guide has your back.
- Pay Attention: Watch how springs and pawls sit during teardown. If reassembled incorrectly, it could lead to slipping issues or sticky pawls. Who needs that hassle? (Bike Radar).
- Where’s the Replacement? Ball bearings usually have a backup, but other bits like pawls might be harder to come by.
| Brand | Important Step | Special Tools Needed |
|---|---|---|
| Shimano® | Swap out those loose bearings | Cassette removal tool |
| Campagnolo® | Use that 5mm Allen key to hold the axle | 5mm Allen key |
| General | Don’t skimp on the grease and oil | Light grease, oil |
Regular tinkering helps dodge issues like slipping, sticky pawls, and rusting. For a full bike check-up calendar, swing by our bike maintenance schedule.
Freehub Lubrication Tips
To keep your bike rolling smoothly and hassle-free, lubrication of the freehub is essential. We’re diving into the best lubricants and methods to keep your gear spinning like a dream.
Types of Lubricants for Freehubs
Picking the right lube can make a world of difference. Park Tool suggests liquid lubricant for the freehub’s innards to cut down on friction and wear. Here’s how the lubes shake out:
| Lubricant | Details | Best For |
|---|---|---|
| Liquid Lubricant | Thin, gets into tight spots | Inside freehub gears |
| Light Grease | A bit thicker, offers cushioning | Outside areas, hubs |
| Dry Lubricant | For dry days, leaves little behind | Chains, outer gears |
Steer clear of regular bike grease inside the freehub. The pawls and bearings in there don’t really stress out much when you’re coasting.
If you’re curious about other parts of your ride, swing by our guide on the best bike lubricants.
Proper Greasing Techniques
Getting the grease just right is key to a happy freehub. Step-by-step care ensures you avoid slipping, sticking, and those irritating squeaks.
- Disassembly: Take apart the freehub with caution, remembering where all those tiny springs and knick-knacks go.
- Cleaning: Scrub everything down well. Get rid of old gunk and dirt. A degreaser might be your best buddy here.
- Lubrication: Squirt some liquid lube on the pawls, making sure it seeps into every nook. Grease the bearings just a tad.
- Reassembly: Put it all back together, making sure parts land in their correct spots. Everything should be snug and aligned just right.
Still, hearing some funky noises after a good lube job? Might be time to think about swapping out that freehub. Check out our step-by-step bike repair guides.
Skipping on lube can bring on some hefty problems like stiff pedaling, annoying racket, and even messing up your drivetrain. Want to dodge these deal-breakers? Our article on bike noise problems has you covered.
Weaving these lube tips into your bike maintenance schedule will help keep your wheels spinning happy and healthy.
Signs of Freehub Wear
Keeping your freehub in tip-top shape ensures your ride goes smoothly. Learning to spot signs of wear or knowing when a replacement is due can seriously level up your biking game.
Detecting Wear in the Freehub
Checking your freehub for wear isn’t rocket science. With a few simple tests, you can do it all at home. Start by grabbing the freehub’s splined body and giving it a good wiggle. If it moves more than a smidgen, say 2mm or so, it might be screaming for a replacement. But if it’s just a tad, a good clean and splash of lube might just do the trick.
Be on the lookout for these red flags:
- Slipping: Pedal and it feels like you’re on a slippery slope? That’s the ratcheting mechanism crying for help.
- Sticking: If engaging gears feel as smooth as sandpaper, you’ve got some internal wear going on.
- Noise: Hear odd clicks or grinding? That’s likely due to bearings or ratchets the worse for wear.
Want to know more about freehub wear? Peek at this guide for more info.
When to Replace a Freehub
Figuring out the right time to swap out your freehub can save you headaches and prevent damage to your bike. If a wash and lube don’t fix those gremlins like slipping or noise, it’s time for a new freehub. Consider replacement if:
- Persistent Problems: After sprucing it up, if slipping or noise sticks around.
- Looseness: As noted, over 2mm of jiggle isn’t good news.
- Visible Damage: Keep an eye out for cracks or gnarly-looking teeth in the ratcheting bits.
Different brands—Shimano®, Campagnolo®, and pals—might have their own rules for freehub swaps. Check brand-specific maintenance guides for their tips and tricks.
| Sign of Wear | Detection Method | Action |
|---|---|---|
| Excessive Wiggle | Wiggle Test | Replace Freehub |
| Slipping | Pedal Test | Clean/Lubricate or Replace |
| Sticking | Engagement Test | Clean/Lubricate or Replace |
| Unusual Noise | Listening Test | Inspect Internal Components |
Being on top of regular maintenance makes a world of difference to your freehub’s lifespan and efficiency. Keeping a routine bike check-up does wonders for smoother rides and happier times.
Don’t skip other important bike jobs while you’re at it—like maintaining your bike bearings or giving the chain a good clean. Need tool advice? Our bike tool kit essentials guide has your back.
DIY Freehub Maintenance
So, you wanna keep your bicycle running like a dream, huh? Well, giving your freehub some attention is a solid move. This section holds your hand with tools, tips, and top-secret maintenance know-how to make your freehub feel brand new, all without leaving your garage.
Required Tools for Maintenance
Let’s face it, nothing ruins a good day like missing that one special tool when you’re knee-deep in bike parts. Here’s the stuff you’ll want to grab before diving into the grease:
- Cassette lockring gadget
- Chain grip thingy
- Bunch of hex doodads
- Cone-spinnin’ spanners
- That trusty flat-head screwdriver
- A nifty pick set
- Torque turner
- Needle-nose pinchers
- That magical degreaser potion
- Some isopropyl booze (alcohol)
- Good ol’ grease
- Light wiggly oil
- Pile of rags
- Scrub-brushes
| Tool/Material | Use |
|---|---|
| Cassette lockring tool | Prying that cassette loose |
| Chain whip | Holdin’ onto cassette for dear life |
| Hex wrenches | Takin’ apart the freehub |
| Cone wrenches | Fiddlin’ with cone nuts |
| Screwdriver | Poppin’ off seals |
| Pick set | De-cruddin’ those tricky spots |
| Torque wrench | Screwin’ back together nice and snug |
| Pliers | Sorting out springs |
| Degreaser | Making stuff squeaky clean |
| Isopropyl alcohol | Final touch cleaning |
| Grease | Slathering bearings |
| Light oil | Tickling the pawls |
| Rags | Swiping excess goo |
| Brushes | Scrubbin’ off the muck |
Having this magic bag of tools nearby makes the whole job more breeze-like and less swear-y.
Step-by-Step Maintenance Guide
Here’s your game plan for free hub pampering:
1. Disassemble the Freehub
- Gently yank off that rear wheel.
- Use your cassette lockring tool and chain whip for the grand un-cassette unveiling.
- Grab those hex wrenches and free the freehub from its hub.
2. Clean and Inspect Components
- Give that freehub body a spa day with degreasers and brushes.
- Scout around for worn-out or dodgy-looking bearings, pawls, and springs.
- Snag those picks and pry away any stubborn muck.
3. Lubricate Bearings, Pawls, and Springs
- Alcohol wipes those bearings like you just shook hands with a flu bug.
- Slather those bearings with grease like they’re going on toast.
- Drizzle light oil on the pawls and springs, ensuring they’re smooth operators.
4. Reassemble the Freehub
- Align your pawls just right and put that freehub puzzle back together.
- Torque wrenches those bolts according to the sacred scrolls (manufacturer’s specs).
5. Reattach the Freehub to the Wheel
- Marry the freehub back to its hub perch using your hex helpers.
- Bring back the cassette with a chain whip and cassette lockring finale.
6. Final Inspection and Cleanup
- Spin it, shake it, and confirm it’s all good with the freehub rotations.
- Polish off grease and oil leftovers with rags like a maestro.
- Reinstall that wheel and celebrate with a spin around the block.
Staying on top of regular freehub maintenance keeps your ride feeling fresh. Got more questions on bike upkeep? Check out our delightful reads on bike maintenance schedules, bike bearing maintenance, and bike tool kit essentials. Your bike will thank you!
Maintaining Freehub Bearings
Understanding Freehub Bearings
Hey there, bike aficionado! So you’re wondering about freehub bearings, huh? Let me tell you, those little rollers are the unsung heroes of your biking adventures. They come in two flavors: cartridge bearings and loose ball bearings snug within the hub. Knowing the difference? That’s golden for keeping your ride smooth and ready (freehub maintenance).
These sneaky little guys, spring-loaded pawls, groove into a ratchet ring inside the hub shell, making sure that every pedal you push is the power to the wheels. Imagine them as the DJs of your bike party, spinning tunes (or in this case, your wheels).
Here’s the scoop on the materials:
- Steel Bearings: The sturdy fellas, reliable and affordable.
- Ceramic Bearings: All about that sleek, friction-free glide and longevity.
Let’s put that into a tidy table for a quick peek:
| Type of Bearing | Material | Perks |
|---|---|---|
| Cartridge | Steel/Ceramic | Easy swaps, squeaky clean from dirt |
| Loose Ball | Steel/Ceramic | DIY doable but demands TLC |
Inspection and Replacement Guidelines
Keep those wheels rolling! Proper bearing maintenance not only extends life but ensures that a sweet, effortless ride feel is always there. Here’s your step-by-step playbook:
1. Get Tools and Prep the Den:
- Find a bright spot with your trusty gear: hex keys, cone wrenches, and bearing pullers. Double-check our list of bike tool kit essentials for any extras.
2. Dismantle the Freehub:
- Start by unseating the wheel.
- Use your cassette lockring tool to liberate the cassette.
- Follow the guide to pry apart the freehub body, keeping tabs on little bits like pawls and springs.
3. Clean Up and Check It Out:
- Slather on some degreaser from the best bike cleaning products. Make it shine!
- Peek at those bearings. Any rust, pitting, or not-so-smooth smoothness?
4. Swap Bearings if Needed:
- Do cartridge bearings? Out with the old with a bearing puller; press in the new buddies.
- For loose balls, swap ’em with newbies, and add some light grease—your bike’s best friend.
5. Lubricate and Put ‘Er Together:
- Slap on some lube or light grease on those bearings, pawls, and springs.
- Rebuild the freehub, making sure everything’s in its happy place.
- Put the cassette and wheel back.
6. Final Spin-Tastic Checks:
- Give the wheel a whirl. Feel good? Sounds right?
- Any odd clinks or clunks? Our guide on bike noise problems is your go-to manual for troubleshooting.
Sticking to regular freehub love—erm, checks—saves headaches and pocket cash. To get into a proper groove with all things bike care, our bike maintenance schedule is your must-see. Happy cycling, you road warrior!
Exploring Freehub Variations
Diving into freehubs is like opening a bag of mixed candy—you never know what delightful surprise you’ll find. Figuring out the quirks of different freehub standards and making sure everything meshes right isn’t just about needing out over bike parts—it’s about juicing up your ride. Let’s break down different freehub designs and how to keep your bike purring like a kitty.
Different Freehub Standards
Freehubs come in a few flavors, each bringing something to the party. They’re designed to match various cycling styles and needs. So, here’s the skinny on what’s out there:
| Freehub Standard | Description | Compatibility |
|---|---|---|
| Shimano Hyperglide | Old-school but gold-standard design that’s been around forever and a day, fitting a smorgasbord of cassettes | Pairs with 8-12 speed Shimano and SRAM cassettes |
| Shimano Micro Spline | The newbie on the block, handling 12-speed mountain biking gears like a pro | Exclusive to Shimano’s 12-speed line-up |
| SRAM XD | Made for stretching the gear range with a 10-42T spread | Suited for SRAM’s 11 and 12-speed drives |
| SRAM XDR | XD’s long-lost sibling, fitting road bikes perfectly | Plays nice with 11 and 12-speed cassettes |
| Campagnolo FW | Stands out with its own groove, can’t be mistaken for anything else | Made for Campagnolo’s exclusive cassettes |
| Campagnolo N3W | The new kid, ready for 12-speed and beyond | Welcomes Campagnolo 12-speed cassettes, likes a spacer for the oldies |
Figures courtesy of Cyclist and BikeRadar
Ensuring Compatibility and Upgrades
Getting the right fit between your freehub and cassette is like setting up the perfect blind date—everything has to click. Here’s your cheat sheet for avoiding an awkward mismatch:
- Figure Out What You’ve Got: Peek at your bike’s owner’s handbook or take it to the neighborhood bike whisperer. Identify your freehub type, it’s the first step.
- Make Them Match: Think of your cassette and freehub like peanut butter and jelly; they’re great together only if they fit right. Remember, a Shimano Hyperglide cassette is not about to hook up with an SRAM XD body.
- Throw in Spacers if Needed: Sometimes they need a little help getting closer. Check the manufacturer’s instructions to see if spacers are needed.
- Contemplate an Update: If you’re switching freehub types, double-check that your wheels don’t have commitment issues. Upgrade where necessary.
- Spruce Things Up: Keep your freehub shiny and slick. For a how-to, take a peep at our bike hub service guide.
- Phone-a-Friend: Use bike manuals, online chats, or hit up your local bike gurus. For more detailed how-tos, peruse our bike repair guides.
Knowing the ins and outs of freehub standards and keeping your setup in sync can make a world of difference. A little repair and awareness can save you heaps of trouble and keep your cycle juiced. Anyway, if you’re keen on mastering the freehub life, we’ve got your back with articles on bike bearing maintenance and bike tool kit essentials. Happy riding!
Conclusion
Maintaining your bike’s freehub is more than just a routine check—it’s the key to a seamless and enjoyable ride. From understanding the intricate anatomy and function of the freehub to implementing regular maintenance practices, each step ensures your bike performs optimally.
Remember, neglecting your freehub can lead to frustrating issues like slipping gears and noisy rides, but with the right tools and knowledge, you can prevent these problems effortlessly.
Equip yourself with the recommended gear and accessories, follow our expert tips, and keep your bike in top-notch condition. Happy cycling!
Frequently Asked Questions (FAQs)
What is a freehub and why is it important?
A freehub is a critical component that allows your bike to coast without pedaling while transferring power from your legs to the rear wheel. It ensures smooth riding and efficient performance.
How often should I maintain my freehub?
Regular maintenance is recommended every 100-200 miles or after riding in harsh conditions. Consistent care helps prevent wear and prolongs the freehub’s lifespan.
Can I perform freehub maintenance myself?
Yes! With the right tools and a step-by-step guide, you can perform basic maintenance at home. However, for complex issues, consulting a professional bike mechanic is advisable.
What are the signs that my freehub needs servicing?
Indicators include slipping gears, unusual noises, stiff pedaling, or excessive wiggle in the freehub body. Addressing these signs early can prevent further damage.
Which lubricant is best for my freehub?
Liquid lubricants like Park Tool’s specific freehub lubes are ideal for the internal components, while light grease works well for bearings. Avoid using regular bike grease inside the freehub.
Are there different maintenance procedures for various freehub brands?
Yes, brands like Shimano® and Campagnolo® have specific maintenance steps. Always refer to brand-specific guides to ensure proper care and avoid damage.
What tools do I need for freehub maintenance?
Essential tools include a cassette lockring tool, chain whip, hex wrenches, cone wrenches, degreaser, grease, and torque wrench. Having a comprehensive bike tool kit makes the process smoother.


